Showing posts with label Sony. Show all posts

Sony Xperia Z5 CM13 (CyanogenMod 13) Marshmallow ROM

Sony Xperia Z5 CM13 (CyanogenMod 13) Marshmallow ROM

Xperia Z5 CM13 (codename: sumire) is a CyanogenMod custom ROM based on Android 6.0.1 built by developer CTXz. This is a development ROM and not a daily usable build. Please proceed if you understand what am I talking of, otherwise don't blame me if something goes wrong.

If you want to know the development status of this ROM then here is the link.

Visit Gadget Specs to get spec comparison and many other details of Mobile phones, Laptops, Camera etc.
WARNING:
Installing custom ROM requires a custom recovery to be installed on your device, which may VOID your warranty and may delete all your data. Before proceeding further you may consider backup your all data. You are the only person doing changes to your phone and I cannot be held responsible for the mistakes done by you.

WORKING LIST:
- NOT KNOWN

KNOWN ISSUES:
- NOT KNOWN

Required files for Xperia Z5 CM13 (codename: Sumire) (CyanogenMod 13) Marshmallow ROM flashing:

- Custom recovery
- CM 13 download link [Select the latest cm-13.0 ROM]
- Android 6.0 GApps download link

Installation guide of Xperia Z5 CM13 (CyanogenMod 13) Marshmallow ROM:


STEP 1:
Copy the ROM and GApps zip file to your phone (By using a USB cable or via adb push command).

STEP 2:
Enter into recovery mode by pressing your device specific key combinations.
Or else if you are on a pc with USB driver and adb installed, then type the following command:
$ adb reboot recovery

STEP 3:
Wipe system partition, cache and data partition. [IMPORTANT]

STEP 4:
Select the Install Zip from SDcard option.
Select the Android Marshmallow ROM zip file for Sony Xperia Z5 and let the installation complete and then reboot and then flash the GApps package and reboot to enjoy CyanogenMod 13 on the Sony Xperia Z5 (codename: Sumire).

Stay tuned to this page for more updates on the working and non-working list. If there is a development forum page will be available I will be add that here so that it will be easier for the users to present their issues to the developer.

[ROM] [CM 12.1] CyanogenMod 12.1 for Xperia Z Ultra based on Android Lollipop 5.1 (Codename: Togari)

Android Lollipop had memory leak issue in 5.0.x versions which has got resolved in 5.1 Android Lollipop.
Xperia Z Ultra users can now enjoy the early builds of UNOFFICIAL CyanogenMod 12.1 based on Android Lollipop v5.1.

WARNING:
Installing custom ROM requires a custom recovery to be installed on your device, which may VOID your warranty and may delete all your data.
Before proceeding further you may consider backup your all data.
Please visit the Disclaimer page below to agree with the risks involved and proceed before flashing this ROM to your phone:
ROM Disclaimer link

Files needed for the installation:

CyanogenMod 12.1 ROM download link for Xperia Z Ultra
Google Apps flashable zip download link

Installing CyanogenMod 12.1 ROM:

STEP 1:
Copy the ROM and GApps zip file to your phone(By using a USB cable or via adb push command).

STEP 2:
Enter into recovery mode by pressing your device specific key combinations.
Or else if you are on a pc, then type the following command:
$ adb reboot recovery
STEP 3:
Wipe system partition, cache, data and dalvik cache (Only if you are coming from KitKat)

STEP 4:
Select the Install Zip from SDcard option.
Select the CyanogenMod 12.1 ROM file, let the installation complete and then reboot.
Complete the initial setup, reboot to recovery and then flash the GApps package and reboot again to enjoy Android Lollipop with CyanogenMod 12.1.

Stay tuned to get more updates

[ROM] OMNI v5.1 ROM for Sony Xperia Z Android Lollipop

omni-rom-v5.1-sony-xperia-z

Omni ROM for Xperia Z is brought to you by XDA recognized developer Olivier.
This is a work of the developer and it's not an official Omni ROM.

WARNING:
Installing custom ROM requires a custom recovery to be installed on your device, which may VOID your warranty and may delete all your data.
before proceeding you may consider backup your all data.
Please visit the Disclaimer page below to agree with the risks involved and proceed before flashing this ROM to your phone:
ROM Disclaimer link

Requirements for this installation:

Omni ROM download link for Xperia Z (Yuga)
Google Apps flashable zip download link
SuperSU rooting zip download link
Unlocked bootloader

Installing Omni ROM:

STEP 1:
Copy the ROM, GApps and SuperSU zip file to your phone(By using a USB cable or via adb push command).

STEP 2:
Enter into recovery mode by pressing your device specific key combinations.
Or else if you are on a pc installed woth the USB drivers and fastboot binaries, then type the following command:
$ adb reboot recovery
STEP 3:
Wipe system partition, cache, data and dalvik cache (Only if you are coming from KitKat)

STEP 4:
Select the Install Zip from SDcard option.
Select the Omni ROM file, let the installation complete and then reboot.
Complete the initial setup, reboot to recovery and then flash the GApps package, then the SuperSU package and reboot again to enjoy the Omni ROM v5.1.

Stay tuned to get more updates

Xperia Z4 Tablet Ultra, the world's highest ever hardware configuration Android device

There is an ultimate hardware spec tablet going to be revealed by Sony in the CES 2015 event.
It seems that this tablet is made for future and this is the highest ever hardware specs packed in any Android device as of writing this article.

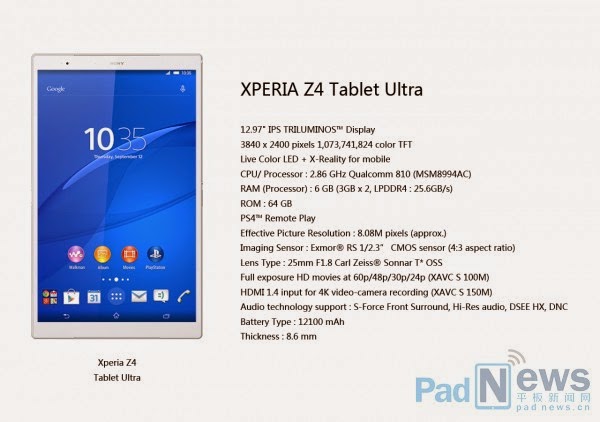
The hardware specs of the New Sony Xperia Z4 Ultra tablet is leaked by PadNews
The leaked image clearly reveals all the hardware spec of the Xperia Z4 tablet ultra.

Key Features of Sony Xperia Z4 Ultra tablet :

  • 12.97 inch IPS TRILUMINOS display
  • 3840x2400 resolution, 1billion color definition
  • 6GB LPDDR4 RAM
  • 2.86 GHz Qualcomm 810 (MSM8994AC)
  • 12100 mAh battery

xperia_z4_tablet_ultra

Full hardware specifications :

DISPLAY:
    - 12.7 inch IPS TRILUMINOS display
    - Display resolution (3840x2400)
    - TFT display with 1 billion color definition

CPU: 2.86 GHz Qualcomm 810 64-bit Octa-core MSM8994AC chipset

GRAPHICS: Qualcomm Adreno 430 GPU

MEMORY:
    - 6 GB LPDDR4 RAM
    - 64 GB Internal memory

BATTERY: 12100 mAh

VIA: Softpedia
SOURCE: Pad News

Stay tuned to get more of such updates.

[ROM] MIUI V5 ROM for Sony Xperia Z L36H based on .238 KitKat factory FirmWare

miui_xperia_z_l36h

This ROM is based on the stock .238 FW for Xperia Z L36H for locked and unlocked bootloader and is available in multi language.
This beautiful custom ROM is brought to you by miui member lpws521.

WARNING:
Installing custom ROM requires a custom recovery to be installed on your device, which may VOID your warranty and may delete all your data.
before proceeding you may consider backup your all data.
Please visit the Disclaimer page below to agree with the risks involved and proceed before flashing this ROM to your phone:
ROM Disclaimer link

Installing MIUI V5 ROM:

To flash this ROM you need the following flashable zip file:
MIUI V5 download link for Xperia Z1

STEP 1:
---------
Copy the MIUI ROM zip file to your SD card(By using a USB cable or via adb push command).

STEP 2:
---------
After copying the MIUI ROM zip file to your SD card you have to go to the recovery mode.
If you have a PC in hand with USB driver installed for your phone then type the following command to go to recovery mode:
$ adb reboot recovery
STEP 3:
---------
If you are coming from other custom ROMs rather than a stock ROM then consider the following steps.

Wipe data, system and do a factory reset.
This will delete all your data on your phone excluding the SD card data.
You may consider backing up your phone applications or make a nandroid backup.
Data backup guide

STEP 4:
---------
Select the Install Zip from SDcard option.
Browse and Select the MIUI ROM zip file where you have kept in the SD card.

STEP 4:
---------
When aroma is prompted choose your bootloader version (LockedBootloader/UnlockedBootloader and Sony VERSION C6603/C6602).

The flashing will take a while.
When it will be done you can reboot your system and enjoy the MIUI V5 on your beautiful Sony Xperia Z.

Stay tuned to get more updates

[ROM] [CM12] UNOFFICIAL CyanogenMod 12 Android Lollipop for SONY Xperia Z1

cm_12_xperia_z_one

It sounds cool when you have the latest Android on your device.
No matter if your phone vendor releases one for you or not.
Because developers around the globe are always there to provide such updates.
Here is a guide that brings Cyanogenmod 12 Android Lollipop build for SONY Xperia Z1 users.
All credit goes to xda senior member NanoSurfer.

WARNING:
Installing custom ROM requires a custom recovery to be installed on your device, which may VOID your warranty and may delete all your data.
Before proceeding further you may consider backup your all data.
Please visit the Disclaimer page below to agree with the risks involved and proceed before flashing this ROM to your phone:
ROM Disclaimer link

KNOWN ISSUES:
Recovery seems to be broken on this kernel, so to flash another version, you will have to reflash a custom boot.img in order to gain recovery.
Camera is broken (You can try with Google Camera and see if it works)
Mic is not working

Files need for this installation:
- CM 12 Android Lollipop 5.0 ROM for Xperia Z1
- If you want ROOT then the SuperSU package v2.27 by chainfire

This ROM does not contain Google applications like Gmail, drive, maps etc. so download the below GApps zip package.
Google Apps recovery flashable zip download link

Installing CyanogenMod Android Lollipop on Sony Xperia Z1:

WARNING:
Make sure you have a CyanogenMod compatible kernel with CWM or TWRP recovery. (if not, then flash a CM kernel using fastboot flash boot boot.img)

STEP 1:
Copy the ROM, GApps and SuperuserSU package to your phone.

STEP 2:
Reboot into recovery and do a Factory Reset/Wipe Data
Format System
Format Dalvik Cache

STEP 3:
Install the ROM, Gapps and superuser recovery flashable zip packages using a custom recovery.

STEP 4:
Reboot your phone to enjoy the ROOTed Android Lollipop on your Xperia Z1 phone.

SOURCE: xda-developers

Stay tuned to get more such updates

[AOSP ROM] Android 5.0 Lollipop AOSP for SONY XPERIA S

Good news for SONY XPERIA S users.
Don't know when the official Android Lollipop will come for Xperia S.
But un-officially xda junior user mickybart has ported the Lollipop AOSP for Sony Xperia S.

WARNING:
Installing custom ROM requires a custom recovery to be installed on your device, which may VOID your warranty and may delete all your data.
Before proceeding further you may consider backup your all data.
Please visit the Disclaimer page below to agree with the risks involved and proceed before flashing this ROM to your phone:
ROM Disclaimer link

Files needed for this update:
- TWRP Custom recovery 2.8.0.1 download link
- Android Lollipop 5.0 ROM download link for Xperia S
- If you want ROOT then the SuperSU package

Installing AOSP lollipop on Xperia S:

STEP 1:
Copy the ROM and SuperuserSU package to your phone.

STEP 2:
Reboot into recovery and do a Factory Reset/Wipe Data
Format System, Cache and Dalvik Cache

STEP 3:
Install the ROM and superuser zip.

STEP 4:
Reboot your phone to enjoy the ROOTed Android Lollipop on your Sony Xperia S.

SOURCE: xda-developers

[ROM] Cyanogenmod 11 Custom ROM for SONY Xperia SP

CyanogenMod is a free, community built, aftermarket firmware distribution of the latest Android version, which is designed to add some more features, increase performance and reliability over stock Android for your device.
CyanogenMod is primarily based on the Android Open Source Project with extra contributions from many people within the Android community.

Before proceeding I would like to mention some of it's working and non-working things.

Working :
- Screen
- Wi-Fi
- Bluetooth
- GPS
- NFC
- LTE
- Mobile data
- Calls/messages
- Camera(including HDR)
- Rear mic


Known Bugs :
- NOTHING

WARNING:
Please visit the ROM disclaimer link before you proceed to flash this.
Understand that I am not at all responsible for your broken device.
ROM disclaimer link.


Pre-requisites for this installation:
- Cyanogenmod 11 ROM zip package for Xperia Sp
- A Custom recovery

NOTE:
This is an on going work and the ROM is made better and better day by day by the developer.
Stay updated with the main development thread which is given in the source link at the end of this page.

Cyanogenmod_11_Xperia_SP
[CyanogenMod 11 for Xperia SP]

Installing Cyanogenmod 11 custom ROM on Xperia Sp:

STEP 1:
---------
Copy the ROM package on your phone.

STEP 2:
---------
Boot into recovery using DOWN button while booting the phone.
Only TWRP/CWM Touch/PhilZ custom recovery is supported.

STEP 3:
---------
Format /system and wipe data.
Flash the ROM zip and GApps package using the custom recovery

STEP 4:
---------
Reboot your phone and enjoy the Cyanogenmod on your device.


Source:
Xda-Developers

Stay tuned to get more of such updates
[CUSTOM ROM] Firefox OS Custom ROM for SONY Xperia SP

[CUSTOM ROM] Firefox OS Custom ROM for SONY Xperia SP

Mozill firefox is a very popular browser.
Firefox has launched it's own OS for smartphones.
Even some of the phones has been in market that is powered by Firefox OS.
This Firefox OS is ported to Sony Xperia SP device by FoXperia developers team.

Before proceeding I would like to mention some of it's working and non-working things.

Known Bugs :
- LTE not working
- Camera bugged
- Headphone not working (audio routing)
- MTP


Working :
- Data(3G)
- Messaging
- Calls
- WiFi
- and more...


As this ROM is not completely working to deal with, So you may wait for some more time if you want a fully ported ROM.
But if you want to see how this works on your device, then you can give it a try.

WARNING:
Please visit the ROM disclaimer link before you proceed to flash this.
Understand that I am not at all responsible for your broken device.
ROM disclaimer link.


Pre-requisites for this installation:
- Firefox OS Custom ROM for Xperia Sp
- Kernel image for Firefox ROM
- Unlocked bootloader and a Custom recovery

Firefox_OS_ROM_Xperia_SP
[Firfox OS Custom ROM for Xperia SP]


Installing Firefox OS custom ROM on Xperia Sp:

STEP 1:
---------
Copy the ROM package on your phone.

STEP 2:
---------
Boot into recovery using DOWN button.

STEP 3:
---------
$ fastboot flash boot <recovery_image_file.name>
e:g fastboot flash boot boot.img

STEP 4:
---------
Flash the ROM zip package using the custom recovery

STEP 5:
---------
Reboot your phone and enjoy the Firefox OS


Source:
Xda-Developers

Stay tuned to get more such updates

[ROOTING GUIDE] SONY Xperia Z3 rooting and installing custom recovery

[ROOTING GUIDE] SONY Xperia Z3 rooting and installing custom recovery

This rooting guide is strictly for Sony Xperia Z3 D6603, D6633 and D6653.
Before rooting your device you have to search for what is rooting and the benefits of rooting and I am NOT RESPONSIBLE for any damage.
If you understand the risk of rooting but still you need to root your device then you are most welcome to this guide.

WARNING - This will void your warranty.
To root your device you have to unlock the bootloader, which may erase all your data in internal storage!


Please follow the link for how to backup all the data on your android device:
Step by step guide to take full backup of your phone data

After taking backup of your phone, go and unlock your bootloader here.
SONY's official bootloader unlock page

Xperia Z3 is not listed over there, so you need to select your device model as "Xperia Z3 Compact"
(Don't worry, it all follows almost the same steps)

After unlocking the bootloader make sure that you have the following things in hand to start with the rooting method.
Required things:
- Xperia Z3 USB Drivers
- Fastboot and adb binaries
- SuperSu binaries developed by Chainfire
- Custom recovery for Xperia Z3 D6653 / D6603 23.0.A.2.93
- Custom recovery for Xperia Z3 D6633 23.0.F.1.74


Xperia_Z3_ROOTING

[Rooting guide for Xperia Z3]


STEP by STEP ROOTing guide for your Xperia Z3:

The complete process will be split into three things as following:
- Unlocking the Bootloader (Which you have already done in the above step)
- Installing a custom recovery
- Installing the ROOT package using the custom recovery


Flashing a Custom Recovery:

STEP 1:
---------
Unzip the fastboot and adb binaries and save it in some folder.
Copy the recovery image file inside the fastboot and adb folder.

STEP 2:
---------
Boot into fastboot mode.
Power off device > hold volume up button + connect USB cable
If you are in bootloader mode then the LED will turn into BLUE

STEP 3:
---------
Now type the following command to install the custom recovery image onto your Nexus device:
$ fastboot flash boot <recovery_image_file.name>
e:g fastboot flash boot bootZ3monxtest01.img
$ fastboot reboot

or you can Reboot and try entering recovery by pressing vol up / vol down repetitively until booting into recovery

Rooting guide:

NOTE:
Rooting guide will only work only after the custom recovery installation.
If you will SKIP the custom recovery installation process and perform only these steps then rooting will not be done.

STEP 1:
---------
After rebooting your phone, Copy the SuperSu zip file to your SD card(By using a USB cable or via adb push command).

STEP 2:
---------
After copying the SuperSu zip file to your SD card you have to go to the recovery and there you have to install this zip file.
To do so use the following command:
$ adb reboot recovery

STEP 3:
---------
Select the Install Zip from SDcard option.
Select the SuperSU zip file where you have kept in the SD card.

After successfully completing all the above mentioned steps your device will be rooted.

Have fun and stay tuned to get more updates.