Showing posts with label Tips and Tricks. Show all posts

OnePlus One Quickboot from CM 12S ported to all CyanogenMod 12.0 and CyanogenMod 12.1 based ROMs

QuickBoot is a Cyanogen OS feature developed by Qualcomm and Cyanogen for OnePlue One.
The objective is to reduce the boot-up time drastically by altering the shutdown / boot-up sequence.
This version of QuickBoot is taken from CyanogenMod 12S and modified by recognized developer arter97 to support Android 5.1 and fixed several NullPointerExceptions.

HOW IT WORKS:
Rather than turning down the device completely,
QuickBoot turns the device into Airplane mode, kills the applications, disables notification and button reactions, similar to how Windows 8 does.
The battery drain during QuickBoot is active is equal to the state of all applications killed & airplane mode.
Note that "reboot" actions remains normal, meaning the device will go into full shutdown / restart on reboot actions.

WARNING:
This hack requires you to install a custom recovery on your device.
Installing custom recovery on your device may VOID your warranty and may delete all your data.
Before proceeding further you may consider backup your all data.
Understand the fact that you are the only person responsible for everything that you do with you device.
If you blame me for a disaster that happened to your device then I will simply laugh at you.

Flashing QuickBoot using custom Recovery:

STEP 1:
Download the QuickBoot recovery flashable zip right here.

STEP 2:
Flash the downloaded zip through custom recovery.

STEP 3:
Enable QuickBoot from Developers options.
If Developer options is not enabled then enable developer options and then enable QuickBoot.

Follow the word of CAUTION: As the device is not completely off, devices with removable battery should use this with caution as pulling off the battery during QuickBoot active may potentially cause data loss.
For devices with removable battery, it is recommended to use "reboot" and wait for the screen to go off and then quickly replace the battery if needed.

Source
How to extend battery life in Galaxy S6 and S6 Edge without ROOTING or any system hacking

How to extend battery life in Galaxy S6 and S6 Edge without ROOTING or any system hacking

Galaxy S6 and S6 edge have 2550 and 2600 mAh battery capacity respectively.
As compared to previous flagship phones and features packed these two device looks to be running with lower battery capacities.
A high end device having high end features require more battery backed power, but reverse is the case with S6 and S6 edge.
So how you do manage when you will be running out of battery when you need it the most.
Here you go how to manage your power consumption of the device without ROOTING or without any system customization.

Your phone has inbuilt power saving features that we are going to use.
Head to Settings > Battery. You'll see two options: Power Saving Mode and Ultra Power Saving Mode.
The Power Saving Mode will restrict some of the features and will help you save battery consumption.
You can run on Power Saving Mode all day without any impact on your performance and day to day usage.
The Ultra Power Saving Mode will restrict background data usage, lower your processor speed and may restrict other things to save more battery power.
Use this mode when you are really running out of battery and you know that you will not be able to recharge it soon.

You may say that when I have so many features in my phone why I will be using any of these.
The answer is: Yes of course you have loads of feature packed on your phone but you are not using all of the stuffs all the day long.
It's really better to use the features when they are needed and let the system decide how it will manage those stuffs.
[FreeBSD] How to install VIM editor in FreeBSD

[FreeBSD] How to install VIM editor in FreeBSD

By default FreeBSD comes in a command line user interface.
As an Administrator or a Device Drive developer or as a FreeBSD user, you must be having a good text editor in hand to work comfortably on a command line environment.
By default there are two such text editors installed under FreeBSD, such as: vi and ee.
There is no such drawback in these editors but VIM (Vi IMproved) is a feature rich text editor as compared to the others, such as: you can access multiple files simultaneously, search for keywords easily across files and many more.

Make sure you have a working internet connection on the system and ports collection installed.

Installing VIM:

For FreeBSD 8.4 and greater versions:
If you are on FreeBSD 8.4 or later, then you can use the next generation package management utility present in FreeBSD.
We will use the pkg utility and even the ports collection will also be useful but why to use a complex path when we have easy to use stuffs.
To install VIM on your machine, type the following command in the command line:
# pkg install editors/vim-lite
For FreeBSD version less than 8.4:
If you are on FreeBSD machine lower than 8.4 version, then you have to use the ports collection and if you don't have, then the below link will help you out installing the ports collection:
Installing ports collection

Now find out where is the location of VIM editor sources that we are going to install.
To know type the following command:
# whereis vim-lite
Then move to the location:
# cd /usr/ports/editors/vim-lite
Type the following command to start installation:
# make install clean
The above step will first build the dependencies for, then install the VIM editor in your machine and after that it will remove the intermediate files generated while building VIM.

After successful completion of the above step type the vim command to see whether vim has installed or not.
$ vim

If you want more information on VIM text editor:

You can check the manual page on your FreeBSD system to have a better idea on VIM editor.
$ man vim
To know more on VIM usage and some useful VIM commands, follow the below link:
Useful VIM commands

[HOW TO GUIDE] How to control unnecessary data usage on an Android phone

how-to-Control-data-usage-on-android

Smartphones are really feature rich and provide so many smart features for the end user.
But out of everything you may not like or need each and every feature.
In this post we are explaining how to control your data usage on an Android phone.

Now a days every single phone gives you e-mail access and every single phone has internet access.
There are so many applications that require internet connection to work, like: Facebook, e-mail applications, google maps and lot more apps.
If your network carrier charges more for your internet usage or you do not require much internet access all the time then you can checkout our guide to know how to minimize data usage on any Android phone.
This guide will save your unnecessary data usage and also it will save your battery usage.

HOW TO TURN OFF BACKGROUND DATA AND AUTO SYNC DATA:


On an Android phone with version greater than 4.0 follow the below steps:

STEP 1:
Goto Settings > Data usage

STEP 2:
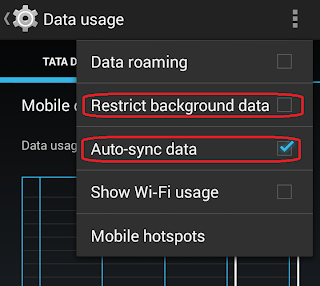
Click on the 3 dots which is there on the upper right side corner as shown in the image.

select-the-dots


STEP 3:
If you want to save your data then un-check the "Restrict background data" if it is checked.
Un-check on the "Auto-sync data" option.

toggle-background-data-and-turn-off-sync-data


This will show you the following pop-up message. Read carefully and click OK.

auto-sync-off-confirmation


HOW TO ENABLE OR DISABLE SYNC OPTIONS MANUALLY:


STEP 1:
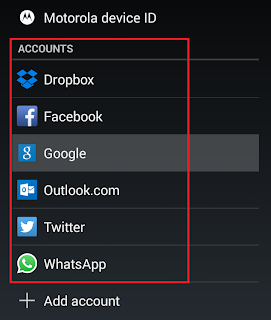
Goto Settings and select your account (Under Accounts section) for which you want to manipulate data sync and other account relevant options as shown in the below image.

Select-account


STEP 2:
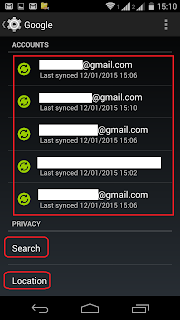
If you have multiple accounts registered lets say under Google accounts then click on the desired account for which you want to manipulate the sync options.
Below image shows multiple Google accounts registered.
If you really wants to save data and more battery charge, then select the "Location" settings and turn off the Location reporting.

Select-google-account


STEP 3:
Select on the right side checkbox to enable or disable syncing for that particular option.
Lets say if you want to enable sync the Gmails for the particular gmail account then you can leave the Gmail checkbox ticked as shown in the below image.

Select-what-needs-to-be-updated

Stay tuned to get more of such updates.

[HOW TO GUIDE] How to download MP3 audio out of YouTube videos

In this internet era we all use youtube for live streaming of videos, movies etc.
Usually those videos are not downloadable.
But we have an android application to introduce that can at least extract the audio from the youtube videos in MP3 format.
If you are looking for such tools or utilities then this guide is for you.

youtube_2_mp3

uTube2MP3 android application:

- Download link for uTube2MP3
- Alternate download link for uTube2MP3

How to download MP3s from YouTube videos:

STEP 1:
First download the application from one of the above link and install it.
Then open the YouTube application on your android phone and select the video from which you want to extract the audio.

slect_video


STEP 2:
When the video window is opened on your YouTube app click on the share button.

click_on_share


STEP 3:
Now select the uTube2MP3 application to share the video with.

select_uTube2MP3_app


STEP 4:
Wait for a while till the download starts automatically.
After download completion you can find the converted MP3 at /sdcard/Download/YouTubeSongs location.

download_location


That's all folks.
Have fun and just stay tuned to get more of such updates
[ROOTED ONLY] [HOW TO] Record screen movement in Android devices

[ROOTED ONLY] [HOW TO] Record screen movement in Android devices

SCR Screen Recorder allows you to record great quality screencasts directly from your phone or tablet.
It uses hardware accelerated video encoding to achieve best quality screen recording on any device.
There may be so many applications around the globe but this one is really one piece.

As per the developer:

It's the only video recorder in the market supporting Tegra devices including Nexus 7.


SCR_Screen_Recorder
[SCR Screen Recorder]

I have personally used this application on my Moto G and it really works very fine and stole my heart and made me write this one for you.

Here is the download link for the free version of this application on Google Play Store.
SCR screen recorder FREE

NOTE:
This application is only for ROOTED devices.
If you have not yet ROOTED your device then definitely this will not work for you.


Download the application and install it to get started.
When you will open this application it will bring you a small widget like stuff in the middle of your screen.
You can hold it and move it to any place on your screen though.
See the below image to get a glance:

SCR_at_a_Glance
[SCR in the middle of the screen]

The first option is to start recording.
Second is for SCR application settings.
Third one is to exit SCR application.

So to get started just press the first soft button and see how it records your movements on your Android device.
To stop the recording you can lock your screen for at least two seconds or you can open the application itself and press the exit soft button.


I hope that's all I wanted to show you.
If you have some concerns regarding this application then you can have a look on the application thread on xda forum.
SCR thread on XDA forum

Cheers. Have fun and stay tuned to get more updates and more such guides.
[HOW TO] Download Android applications from Google Play Store to your PC

[HOW TO] Download Android applications from Google Play Store to your PC

You all may know that Android phones are very much popular everywhere.
As Android phones are popular of course there are lots of Android apps available around.
But all the android applications are available only through Google Play Store and you are not allowed to download the applications.

Let's say if you format your phone for some reason then you have to download all the applications again from the Play Store, isn't it???

You may ask here, So what???
What's wrong in downloading again???

Well, I must say here, what if you can download the applications to your PC and use them again and again.
So, you don't need internet connection after downloading once.
Isn't that sounds cool???

So below are the things you have to follow to get the Android Application (apk) files directly to your PC.
The procedure requires to have a Google Chrome browser.
I am pretty sure that you all have some browsers installed on your PC, because a browser is the gateway to enter into the world of internet.
If you don't have a Google Chrome browser then you have to download that.


Downloading Android Applications from Google Play Store:

Open the Extension window on your Google chrome browser.

Open_Google_Extension
[Open the Extension window on Google Chrome]


Click on get more Extensions.

Click_on_Extensions
[Click on get more extensions]


Search for the "apk downloader" extension.
Click on free.
Click on Add when asked for the extension confirmation.

Search_apk_downloader
[Search APK downloader extension]


Now open the Google play store.
Search any application on Google Play Store.
you will find a new option added as "Download APK"

doownload_play_store
[Download APK option on Google play store]


It will ask you for your registered gmail account on google play store and the password.
After that there is a field for the device ID which you will get in your phone status.
Fill the details and cheers.

NOTE:
To get the Device ID, download the Device ID application from Google Play Store.
Device ID application on Google Play Store.

GSF_ID_on_Device_ID_App
[GSF ID is what you need]


If you are unable to login using your gmail credentials then you should go to the following link and enable less secure applications.
Gmail less secure credentials page

less_secure_gmail_credentials
[Enable less secure applications]


After successfully setting up everything you are done.
Cheers. Have fun and stay tuned to get more updates and more such guides.

[HOW TO] Run Android applications on your Windows PC

You all may know that Android phones are very much popular everywhere.
As Android phones are popular of course there are lots of Android apps available around.

And android phone is required to run those android application!!!
But not any more you need not to have an Android phone to enjoy all of these beautiful android applications.
There are so many Android emulators out there in the market that will allow you to run android applications on top of any other Operating systems.

Emulators are applications for some platforms that will allow you to run Applications of other platforms.
You can say that an emulator is a cross platform application.

Here I will be taking the example of Blue Stack Android Emulator that runs on Windows OS platform and allows you to run Android applications.

What all benefits you will get out of this Android emulator???
Lets say you don't have an Android phone but you have a Windows PC and you want to play Android apps.
Android Emulator is the solution.
Download an Android Emulator and download android apps and start playing

Say you are not allowed to use your phone or your parents have locked it.
At times you need to contact your loved ones but you are not allowed to touch your phone.
So, grab an Android Emulator and run your favourite social networking apps like facebook, whatsapp or hike messanger or just any other app and stay close to your loved ones.

There are so many other use cases of the Android Emulators.

Let's see how to setup the Android emulator and how to configure it.
First of all download the Blue Stack Android emulator right from the below link:
Blue Stack Android Emulator download link for Windows OS


When download finished go and start the installation by double clicking on the executable file.
When the installation will be started at first the Blue Stack application will download some of it's essential files over the internet.
So you have to wait for a while till it finishes it's job.
Depending on your internet speed the wait time will vary accordingly.

Blue_Stack_install
[Blue Stack Installation]

After that Blue Stack will initialize itself and then all DONE.
You will be landed on a page of application list.

Blue_Stack_initializing
[Blue Stack Initializing]


If you are asked about AppStore enable and Enable App Sync then just click on Continue.

Blue_Stack_app_sync
[Enable App store and App sync]


It will ask your gmail credentials to proceed.
Provide the details for your gmail account.
If you don't have a gmail account then go and create one.

Blue_Stack_gmail_credentials
[Provide gmail credentials]


When gmail login is done, click on Let's go to get started.

Blue_Stack_app_sync_DONE
[App store enabled and App sync DONE]


After that the Play Store will be opened automatically and you will have literally an Android system in front of you.
You are ready to download almost every application.

Blue_Stack_play_store
[Android Play Store on Blue Stack]


Watch the Blue Stack video right here.


[Blue Stack Android Emulator]


Cheers. Have fun and stay tuned to get more updates and more such guides.

How to use a QR code to exchange information between devices

How to use a QR code to exchange information between devices

What is a QR code first???
A QR code is typically a machine-readable code consisting of an array of black and white squares, typically used for storing URLs or other information for reading by the camera on a smartphone.

How does a QR code look like???
A QR code looks similar to the below image.

So how these QR codes are helpful for you in your day to day life???
Say you have visited a website on your PC and you want to visit the same page on your mobile.
Here you can generate a QR code quickly for the particular webpage and read the QR code through a QR code reader on your phone and that's all.
How easy it is.


infysim_qr_code
[QR code for http://www.infysim.org]


Say you have found an MP3 file on web and you want it to be on your phone.
Here what you can do is, just find out the download link for the MP3 file and generate a QR code for that MP3 file and use the QR code scanner application on your phone to read the QR code generated.


You can hide web links on such QR code images so that nobody will come to know what these QR code say (untill unless they don't know what a QR code is).

You can create a QR code for a Contact, a URL, A phone number, an SMS.

There are so many other stuffs that you can do with QR codes.

Lets see how to use it with pictorial demo.
I will take the example of this particular blog post which you are reading right now.

Identify the web link first.
In our case the web address of this page is what you want to convert, so here is the web address: QR_Code

Find out a free QR code generator website.
Althogh there are so many sites available but I will be using the following one:
www.the-qrcode-generator.com

You can see that you can use a Message, URL, a phone number to convert it into a QR code.

qr_code_generator
[www.the-qrcode-generator.com web interface]


Now download a QR code scanner on your phone.
I use bar code scanner application.
Below is the link:
Bar code scanner Android application

This is an Android application.
You can use similar alternatives for a Windows phone or an iPhone or any other phone.

Now open the bar code scanner application and try to read the QR code that I have generated for this particular page.

infysim_qr_code
[QR code for this page]


You can see that the information behind the QR code will be visible to you on the bar code scanner application.

bar_code_scanner
[Bar code scanner application screenshot]


Have fun and stay tuned to get more such updates and how to guides.

[HOW TO GUIDE] How to create a local wifi network without using any wireless router

Most of us are using smart phones now a days. Similarly many of us have PCs or laptops too.
Sometimes we do have resources but we really don't know how to use them efficiently.
Here in this tutorial I will explain how you can manage to create a local area network or home network without any help of wireless routers.

I will introduce you with some of the applications that will run on your PC or laptop and create a wireless network for you.
After completing this tutorial you will be able to connect all your wireless devices to each other and even share files, internet connection on your PC or laptop with the connected devices.


Wifi_hotspot


NOTE:
You need to have a wireless device embedded to your laptop or PC which you want to turn into a wireless network hub.

Now a days each and every laptop comes with inbuilt wifi device and even some of the PCs also have wireless card connected internally.
Now there are some applications available out there which will use the available wireless device on your machine and will turn your machine into a wireless network hub.


[Wireless hotspot demo]


Following are the applications that I am going to use to create a wireless network:
- Virtual Router
- mHotspot download link
- Connectify


Below are the direct download links for each of them:
- Virtual Router download link
- mHotspot
- Connectify download link


Out of the three applications I will suggest you to go for the Virtual Router, because it's completely free as it is an open source application.
Of course there is no such restrictions, you can download all of them and see which one you like the most and you can continue with that.

So go ahead, download the application and install it first.
I will take the video from mHotspot to show you how to setup the wireless and network and more or less the same procedure will be applicable to the other applications too.

Here is a video tutorial that shows How to create a wireless hotspot:


[How to setup a wireless network with mHotspot]