Showing posts with label How to guide. Show all posts

OnePlus One Quickboot from CM 12S ported to all CyanogenMod 12.0 and CyanogenMod 12.1 based ROMs

QuickBoot is a Cyanogen OS feature developed by Qualcomm and Cyanogen for OnePlue One.
The objective is to reduce the boot-up time drastically by altering the shutdown / boot-up sequence.
This version of QuickBoot is taken from CyanogenMod 12S and modified by recognized developer arter97 to support Android 5.1 and fixed several NullPointerExceptions.

HOW IT WORKS:
Rather than turning down the device completely,
QuickBoot turns the device into Airplane mode, kills the applications, disables notification and button reactions, similar to how Windows 8 does.
The battery drain during QuickBoot is active is equal to the state of all applications killed & airplane mode.
Note that "reboot" actions remains normal, meaning the device will go into full shutdown / restart on reboot actions.

WARNING:
This hack requires you to install a custom recovery on your device.
Installing custom recovery on your device may VOID your warranty and may delete all your data.
Before proceeding further you may consider backup your all data.
Understand the fact that you are the only person responsible for everything that you do with you device.
If you blame me for a disaster that happened to your device then I will simply laugh at you.

Flashing QuickBoot using custom Recovery:

STEP 1:
Download the QuickBoot recovery flashable zip right here.

STEP 2:
Flash the downloaded zip through custom recovery.

STEP 3:
Enable QuickBoot from Developers options.
If Developer options is not enabled then enable developer options and then enable QuickBoot.

Follow the word of CAUTION: As the device is not completely off, devices with removable battery should use this with caution as pulling off the battery during QuickBoot active may potentially cause data loss.
For devices with removable battery, it is recommended to use "reboot" and wait for the screen to go off and then quickly replace the battery if needed.

Source
How to extend battery life in Galaxy S6 and S6 Edge without ROOTING or any system hacking

How to extend battery life in Galaxy S6 and S6 Edge without ROOTING or any system hacking

Galaxy S6 and S6 edge have 2550 and 2600 mAh battery capacity respectively.
As compared to previous flagship phones and features packed these two device looks to be running with lower battery capacities.
A high end device having high end features require more battery backed power, but reverse is the case with S6 and S6 edge.
So how you do manage when you will be running out of battery when you need it the most.
Here you go how to manage your power consumption of the device without ROOTING or without any system customization.

Your phone has inbuilt power saving features that we are going to use.
Head to Settings > Battery. You'll see two options: Power Saving Mode and Ultra Power Saving Mode.
The Power Saving Mode will restrict some of the features and will help you save battery consumption.
You can run on Power Saving Mode all day without any impact on your performance and day to day usage.
The Ultra Power Saving Mode will restrict background data usage, lower your processor speed and may restrict other things to save more battery power.
Use this mode when you are really running out of battery and you know that you will not be able to recharge it soon.

You may say that when I have so many features in my phone why I will be using any of these.
The answer is: Yes of course you have loads of feature packed on your phone but you are not using all of the stuffs all the day long.
It's really better to use the features when they are needed and let the system decide how it will manage those stuffs.
How to reboot the Galaxy S6 and S6 edge when it hangs

How to reboot the Galaxy S6 and S6 edge when it hangs

From Samsung’s Galaxy S series devices, all have removable batteries.
If a device hanged for some reason then you could pull the battery out to make the device a forceful shutdown and restart it manually.
But in case of a Galaxy S6 and an S6 edge where you have a non-removable attached battery beneath the metal and glass constructed body.
So what do you do if you have to reboot the Galaxy S6 when it hangs?

Do you think that Samsung has not taken this into account and simply released the phone to market?
Not to worry, because a simple three-button combination which doesn’t take more than a few seconds will help you out of this situation.
Press and hold the volume down + home + power/lock buttons for a few seconds until the phone shuts down by itself.
And then wait for a while for the phone to restart of its own. If not then you start the phone yourself.
In case you were wondering then get notified that this trick works for the Galaxy S6 edge as well.
[FreeBSD] How to set and unset loader variables in boot loader prompt

[FreeBSD] How to set and unset loader variables in boot loader prompt

Important question is why you need to set and unset variables at boot time???
The answer is when something is stopping you from booting your system then this may help you make your day easier.
There are so many variables set by default in the system by various kernel subsystems or driver modules.
you can find the default variables in /boot/defaults/loader.conf and user set variables in /boot/loader.conf file.
You can see all the variables set at the loader prompt by typing the command "show" (without the quotes).

So lets get started to know how you can manipulate loader variables.
Remember that all the commands named below are valid for boot loader prompt in FreeBSD only and these commands will not work on a command shell.
Press ESCape when you are at FreeBSD boot prompt to enter into the loader prompt.

The loader prompt will look like this:
OK _
To see all the variables loaded you can type the following:
OK show
To set a varibale enter the following:
OK set <varibale_name>=<value>
For example OK set abc="1" or abc=1 (both will work), where abc is the variable name and 1 is the value set to the variable.

To unset a varibale enter the following:
OK unset <varibale_name>
For example OK unset abc
Remember that to unset a variable only the variable_name is needed and the value is not at all needed.

If you need to know more of such commands on FreeBSD check the below link:
All FreeBSD stuffs
[FreeBSD] How to allow Root access on FreeBSD over ssh protocol

[FreeBSD] How to allow Root access on FreeBSD over ssh protocol

By default FreeBSD does not allow root access over ssh protocol.
So if you need to log on to your FreeBSD machine over ssh with root privilege, then you have to allow root user access for ssh login.
In this example I am using VIM as the text editor but if you don't have VIM editor then you have to use the default EE or VI editor.

If you want to install VIM editor please have a look at the following link:
Installing VIM editor on FreeBSD

To do so, You will need to edit the SSH daemon configuration file.
#vim /etc/ssh/sshd_config
Find the below line in the above file:
#PermitRootLogin no
The preceding # mark shows that this line is commented.
You just have to un-comment the line and modify the "no" at the end of file to "yes" (Of course without the quotes).
After modification the line should be looking like as following:
PermitRootLogin yes
Save the file and quit vim editor.

Now to reflect the change, you have to restart the ssh daemon by typing the following command on the console:
# /etc/rc.d/sshd restart
After the above steps if you try accessing your system from another host over ssh protocol, you must be able to login to your system.

If you need to know more on VIM commands then please have a look at the following link:
VIM commands for day to day usage

[FreeBSD] How to install ports collection manually in FreeBSD

how-to-install-ports-collection-in-freebsd

As an Administrator or a Device Drive developer you may need some utilities on the go to work in a convenient environment.
Let's say you want to install VIM editor, then you need to have ports collection installed in your system otherwise you have to add the particular package manually.
It's always a better idea to keep the ports collection installed in your system either while installing system or manually as explained below.

Installing ports collection manually is needed if you have not done while installing.
Please see the following to see where you have to set it up:
Distribution select step

NOTE:
Please make sure that you have a working internet connection on the system where you are going to install ports collection.

Installing ports collection:

First fetch a compressed snapshot of the ports tree.
# portsnap fetch
Extract the compressed ports tree.
# portsnap extract
Then update the ports tree.
# portsnap update

More information on portsnap:

You can check the manual page in your FreeBSD system to have a better idea on portsnap.
$ man portsnap

How to search the apps in the ports collection:

When you need an application then type the following command and see what result you get.
For vim editor type the following command:
# whereis vim
There you are.
The output of the above command tells you from where can you install vim command.
# /usr/ports/editors/vim

[FreeBSD] How to Install FreeBSD OS, Step by step guide using a virtual machine

Take a deep breathe and be sure that you have at least an hour of time.
We have to go a long way towards an important step.

Before going into any administration or any driver development guide, you must know how to install FreeBSD and configure it.

Just to stay in the safe side I will take the help of Virtualization software to install the FreeBSD OS.

So here goes the details about what all things you have to be with you before we start:
1.) FreeBSD OS ISO image or a DVD containing the bootable FreeBSD OS.
2.) A virtualization software
3.) A Host PC
4.) Enough time and confidence

1.
For the FreeBSD OS ISO image I have chosen the FreeBSD 10.0 and beolw is the download link for the same:
FreeBSD 10.0 64-bit CD version

For the sake of simplicity the above link is for a minimal version of FreeBSD 10.

If you have enough bandwidth or you want to download the DVD version, then here is the link:
FreeBSD 10.0 64-bit DVD version

2.
Oracle VirtualBox is a free Virtualization software and that is the one we are going to use for our purpose.
Below is the download link for the Oracle VirtualBox:
Oracle VirtualBox download link

Select the corresponding executable Based on you Host PC OS.

For example, if you are on a Linux OS then select: VirtualBox 4.3.12 for Linux hosts, download the binary and install the Virtualization software.

I am on a windows machine so I am choosing the "VirtualBox 4.3.12 for Windows" hosts link.

When you are done with downloading the essential things, we can move forward to the next steps.
Before installing FreeBSD we have to setup a Virtual storage on Oracle VirtualBox which is the first thing.
So lets move ahead and setup the Virtual storage.

-->

Steps for setting up a virtual Hard Drive for the FreeBSD guest OS on Oracle VirtualBox:


I am telling you again, Before heading ahead make sure that the Oracle VirtualBox is installed in your HOST PC.

So let's start.

STEP 1:
---------
Open the VirtualBox and in the first screen select the "New" button as marked in the following picture.


STEP 2:
---------
In the next window select the OS you want to install.
Start typing the OS name as "FreeBSD 10" and the other fields get filled automatically.


STEP 3:
---------
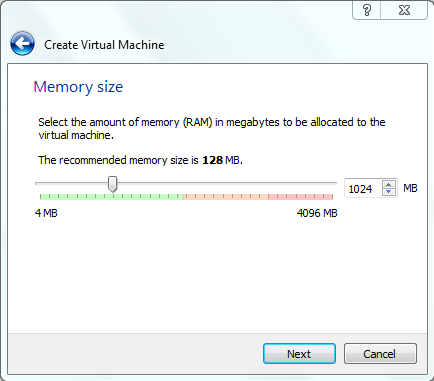
In the next window set the amount of RAM that you want to share with the Guest OS, that is the FreeBSD 10.0.
The Guest OS does not have any physical RAM of it's own and hence it uses the RAM from the actual physical RAM size.

WARNING:
Here you have to select the number very carefully because the Virtual OS (FreeBSD) will use the RAM from your physical RAM that you have in your system.
Let's say your system has some 4GB of RAM then it is okay to allot half of physical RAM to the virtual OS.
If you allot more RAM to the virtual OS then your Host OS (Windows or linux OS on which you have installed the VirtualBox software) may get slower and will not response quickly.

I have 4GB of RAM in my system and I am giving 1GB of RAM to the Virtual OS(Guest OS) i.e the FreeBSD 10.0 in our case.


STEP 4:
---------
Create a Virtual hard drive so that the virtual OS will use this hard drive area as it's own storage.


Select the virtual har drive filetype as VHD.


STEP 5:
---------
In the next window select the option for how the virtual storage will occupy in the actual hard disk space.
If you select Dynamically allocated then the Virtual Hard Drive size will grow dynamically as you will be using in the Virtual OS.
The Fixed Size option allocates a fixed amount of storage for the Virtual drive from the actual hard drive.

Here I have selected Dynamically allocated so as to adjust the future need of storage inside the FreeBSD Guest OS.


STEP 6:
---------
- Select the location where you want to create the Virtual hard Drive
- Then select the maximum size that you want to allow for the Guest OS to be allocated.
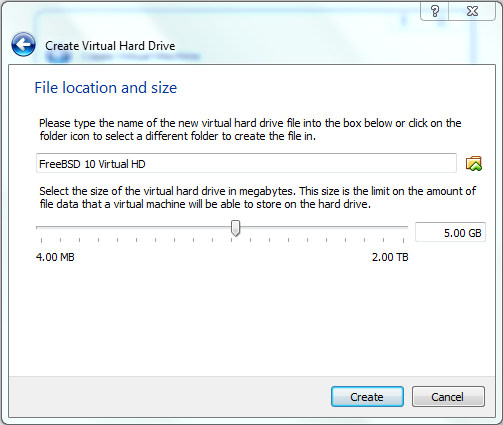


DONE Setting up Virtual Storage.

Now when you have a Virtual storage ready but it does not contain any data right now.
think of the Virtual Storage as a blank Hard Disk, where we have to install the OS.
So we have to install the OS on the storage, so that the next time we will start the virtual storage it will boot from the Virtual Storage itself.


NOTE:
---------
At some point of time if you have clicked the mouse pointer inside the Guest OS window then you will not be able to see your mouse.
So do not panic and just click the "right ctrl" button to bring back your mouse pointer to the HOST OS.

-->

Now we will start Setting up FreeBSD guest OS on Oracle VirtualBox VHD:


STEP 1:
---------
Click on the Start to start to boot from the virtual Hard Drive.


STEP 2:
---------
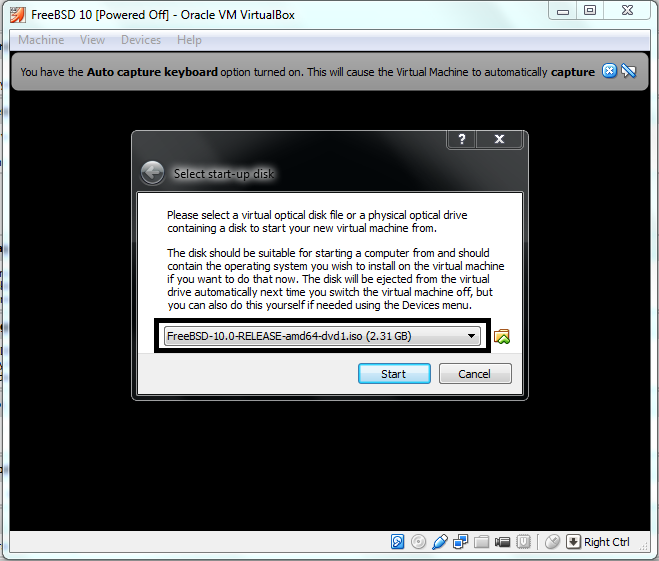
In the next window select the startup disk from where the new Virtual machine will bootup.
Click on the marked area to open the file browser and locate the ISO file and click on the start.


In case of a DVD or a bootable USB of FreeBSD then simply click on the selection box to select the corresponding drive and click on the start.


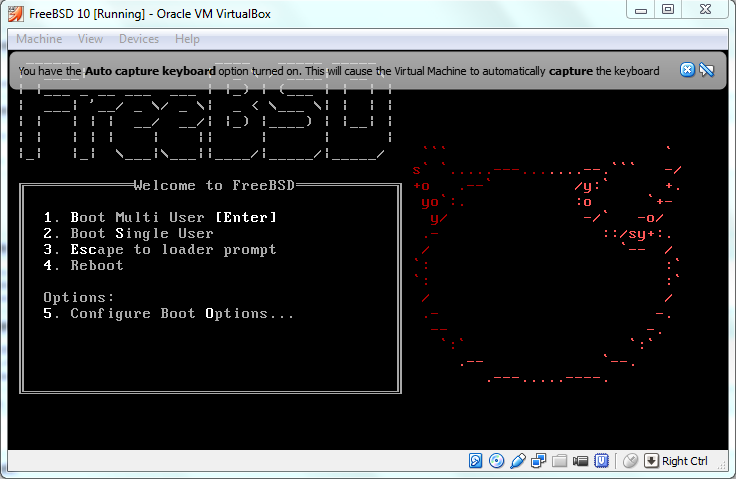
In case of successful boot from FreeBSD startup image, you will see the following details on the screen.


Following is the boot option screen that asks the user to select one option for the booting environment.
It will automatically select default option, so for now you do not need to touch anything.
I will discuss this part after complete installation about each and every option in very detail.


STEP 3:
---------
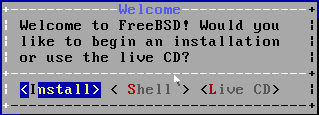
Now select the <Install> option to start the installation process of FreeBSD 10.


STEP 4:
---------
Now in the KeyMap selection window you may choose according to the suitable options from the list.
But I will strongly recommend you to not to modify anything.
So the default option will be ">>> Continue with default keymap" and press <select>.


STEP 5:
---------
In the next window choose a name or label or an alias for your system.
You can select any name of your choice at this step.
For example I am selecting a name: FreeBSD_10_PC


STEP 6:
---------
In the next window of Distribution Select, there are the following listing:
    -> Additional documentation
    • Extra documentation related to any command or utility etc. will be added to your default installation
    • This is helpful for beginners and even for advanced users
    -> Games
    • Some extra Games will be included in the installation
    • For our purpose you can leave this option
    -> 32-bit compatibility libraries
    • As this is a 64-bit OS, so extra binary support will be added for 32-bit executable binaries
    • We may need the help of 32-bit binary support for some utilities, so leave this option checked
    -> Ports tree
    • Extra utilities or packages like vim, fio, cpio, rpm2cpio are not included by default in the system
    • If you choose this option then the related sources and build dependencies will be copied to your system
    • I strongly recommend to include this option, because it will give us sources and build files for loads of utilities
    -> System source code
    • if you are a developer then you need this
    • Because we will be learning device driver development later, so I am keeping this option


Use the up and down arrow keys to move up or down and the space bar to check or uncheck an option.
After setting the desired options press <OK>.


STEP 7:
---------
Now be careful in the partitioning step.
As we are installing the FreeBSD on VirtualBox, so we need not to worry.
But when you will be installing on your physical Hard Disk, you need to be very careful about the options what you are selecting.

I recommend you to select the Guided partition option for beginners.


Then choose the <Entire Disk> option.


Then you will get the Partition Editor window which will show you the current partition layout.
The ada0 is the device name allotted for the disk storage.
ada0p1, ada0p2 and ada0p3 are different partitions on the disk ada0 mounted with boot partition, root filesystem and swap partition respectively.

Do not modify anything here and just press the <Finish>.


Now in the Confirmation window press <Commit>.


When you will select Commit, the following things happen:
- 3 partitions will be made on the storage disk as mentioned above and the partition info will be registered in the MBR of the disk and this process is known as formatting the disk.
- After the partitions are created successfully, the FreeBSD installation process will be started and the installation of the packages that you have selected in the STEP 6 will also be downloaded to your system from the DVD OS IMAGE to the disk.


STEP 8:
---------
When the installation will be completed you will be asked for the ROOT password.
By default "root" is the Super user for the FreeBSD system.
The root user has the highest privileges in the system.
Select a password of your choice and remember that.


STEP 9:
---------
Setup the ethernet controller.


Select <Yes> to setup IPv4.


Select <Yes> to setup DHCP.


Select <Yes> if you need to setup IPv6.


If you know that your CMOS time is set to UTC then yes other wise select <NO>.
And then select your continent and then your country to select the Time Zone.


STEP 10:
---------
System Configuration:
Here are 5 options to select as in the below image.

sshd:
If you are a network administrator or if you want your FreeBSD system be accessible from any system on your network through SSH protocol then enable the first option.

dumpdev:
If you are a developer and want to learn device driver development then this option will be a must for you.
This option will enable the system to dump the system memory and status snapshot when it crashed, to the /var/crash directory.

STEP 11:
---------
Add users to the newly installed system:
It's always a good idea to add a user to the system and always use the system in the user mode and you always have the SUPER USER privilege when you need.


Add the below details as per your interest.

If somewhere asked for (yes/no) in this step then you can answer by typing "yes" or "no" if needed otherwise simply press enter and the default value will be taken by the system.


At the end of this everything is DONE.

But in case you need to setup or modify something then you have a Final Configuration setup step.


I recommend you not to modify anything and simply get out of the installation by Selecting <Exit> because we are all done.

After this step you will be asked to use a shell to make changes manually to the system.
Here press to enter the system but not to modify anything.
When you will press yes you will be landed in a root (Super User) privileged shell.

When you are inside the command line or the shell, type the below command to shut the system down:
# init 0

Because we do not want to reboot the system after this installation.
If you do restart then the VirtualBox will boot into the Live CD.

WE ARE DONE WITH THE INSTALLATION.

But before proceeding to reboot the system we need to do some extra work to remove the bootable DVD or ISO image from the VirtualBox so that the Virtual OS will be loaded from the Virtual storage and not from the ISO or DVD that we have set.


Follow the below steps to remove the bootable image from the VirtualBox booting list:

Click on the Settings.
Then click on the Storage in the left side.
Now clickon the minius (-) button as shown in the below image and when asked to delete, click on Remove.


Of course this was a quite long thread to read and execute it's steps.
Hope you have learnt something out of this post.

Get your hands-on with this and I will bring you other things very soon.


Stay tuned to get more information on FreeBSD.
[HOW TO GUIDE] How to control unnecessary data usage on an Android phone

how-to-Control-data-usage-on-android

Smartphones are really feature rich and provide so many smart features for the end user.
But out of everything you may not like or need each and every feature.
In this post we are explaining how to control your data usage on an Android phone.

Now a days every single phone gives you e-mail access and every single phone has internet access.
There are so many applications that require internet connection to work, like: Facebook, e-mail applications, google maps and lot more apps.
If your network carrier charges more for your internet usage or you do not require much internet access all the time then you can checkout our guide to know how to minimize data usage on any Android phone.
This guide will save your unnecessary data usage and also it will save your battery usage.

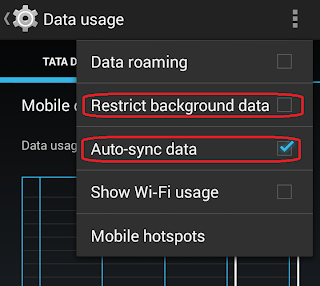
HOW TO TURN OFF BACKGROUND DATA AND AUTO SYNC DATA:


On an Android phone with version greater than 4.0 follow the below steps:

STEP 1:
Goto Settings > Data usage

STEP 2:
Click on the 3 dots which is there on the upper right side corner as shown in the image.

select-the-dots


STEP 3:
If you want to save your data then un-check the "Restrict background data" if it is checked.
Un-check on the "Auto-sync data" option.

toggle-background-data-and-turn-off-sync-data


This will show you the following pop-up message. Read carefully and click OK.

auto-sync-off-confirmation


HOW TO ENABLE OR DISABLE SYNC OPTIONS MANUALLY:


STEP 1:
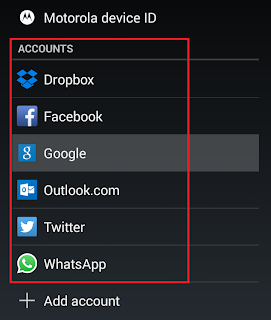
Goto Settings and select your account (Under Accounts section) for which you want to manipulate data sync and other account relevant options as shown in the below image.

Select-account


STEP 2:
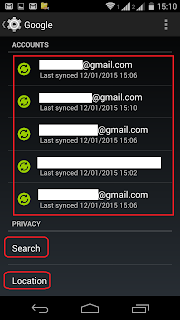
If you have multiple accounts registered lets say under Google accounts then click on the desired account for which you want to manipulate the sync options.
Below image shows multiple Google accounts registered.
If you really wants to save data and more battery charge, then select the "Location" settings and turn off the Location reporting.

Select-google-account


STEP 3:
Select on the right side checkbox to enable or disable syncing for that particular option.
Lets say if you want to enable sync the Gmails for the particular gmail account then you can leave the Gmail checkbox ticked as shown in the below image.

Select-what-needs-to-be-updated

Stay tuned to get more of such updates.

[HOW TO GUIDE] How to download MP3 audio out of YouTube videos

In this internet era we all use youtube for live streaming of videos, movies etc.
Usually those videos are not downloadable.
But we have an android application to introduce that can at least extract the audio from the youtube videos in MP3 format.
If you are looking for such tools or utilities then this guide is for you.

youtube_2_mp3

uTube2MP3 android application:

- Download link for uTube2MP3
- Alternate download link for uTube2MP3

How to download MP3s from YouTube videos:

STEP 1:
First download the application from one of the above link and install it.
Then open the YouTube application on your android phone and select the video from which you want to extract the audio.

slect_video


STEP 2:
When the video window is opened on your YouTube app click on the share button.

click_on_share


STEP 3:
Now select the uTube2MP3 application to share the video with.

select_uTube2MP3_app


STEP 4:
Wait for a while till the download starts automatically.
After download completion you can find the converted MP3 at /sdcard/Download/YouTubeSongs location.

download_location


That's all folks.
Have fun and just stay tuned to get more of such updates

[HOW TO] How to install Android 5.0 Lollipop AOSP with GAPPS on Nexus 5

The latest Android Lollipop source code was released on 3rd November this year.
So the official builds will be released very soon but not yet available for most of the devices.
But un-officially Anderson Aragão has ported the Lollipop AOSP for Google Nexus 5.

WARNING:
Installing custom ROM requires a custom recovery to be installed on your device, which may VOID your warranty and may delete all your data.
Before proceeding further you may consider backup your all data.
Please visit the Disclaimer page below to agree with the risks involved and proceed before flashing this ROM to your phone:
ROM Disclaimer link

Pre-requisites for this installation:
- Android Lollipop 5.0 with Gapps for Nexus 5
- If you want ROOT then the SuperSU package
- Nexus 5 loaded with a Custom recovery

NOTE:
If you don't have a custom recovery installed on your device then head towards the following link to install custom recovery.
installing Custom recovery on Google Nexus devices

Lollipop_on_Nexus_5
[Android Lollipop on Nexus 5]

Installing AOSP 5.0 Lollipop on nexus 5:

STEP 1:
---------
Copy the ROM and SuperuserSU package on your phone.

STEP 2:
---------
Reboot to recovery and flash the Lollipop ROM zip that you have downloaded earlier
Reboot your phone and finish the first time setup on your phone.

STEP 3:
---------
Reboot to recovery again and flash superuser zip.

STEP 4:
---------
Reboot your phone, finish the setup and enjoy the Android Lollipop ahead of the official release.

ALSO SEE: How to get back to Stock ROM on any Nexus Device

Stay tuned to get more such updates